
Item #PRS-1416
Thank you for your interest in our Puresound PRS-1416 snare wires. This
strainer is referred to as the Slingerland 3-point and was used from
the 50's through the 70's by Slingerland on the Radio King Snare Drums.
Due to the variations of the manufacturing process at the time and the
varied depths of this drum we designed our wires to accommodate these
variances. This will require some modification to the snare wires for
installation on your drum.
Before you begin please read the diclaimer at
the bottom of this page.
Installation instructions
1. Start with the butt side. Place the wires on the drum so they extend over the shell evenly on the butt and strainer side.
2. While applying even pressure bend the metal tab over the extended butt and in to place with the butt plate and mounting screws off of the drum. Temporarily attach the plate and screws to hold into place.
3. If you do not have the old wires to match up the strainer side then you will have to make the first bend similar to the butt to see where the tab comes in contact with the strainer. If you have the old wires then skip to the next step. (important that the tension screws is mid to lower level so the snares have room to tighten correctly when the strainer is locked in)
4. Match the length of the old wires to the new wires and mark the strap. If you are not comfortable using tools then find someone qualified to perform these next two steps. It is time to cut the strap to the correct length. This can be done with a tin snip. Better at this point to give your self a little extra so you can test the length again. Once you are satisfied with the length go to the next step.
5. Take the strainer apart and hold the strainer slide assembly and the tab together so you can mark the hole from the underside. Once the hole is marked if you have the technical ability drill a 1/8" hole.
6. Test fit the screw. Adjustments may be necessary
with the hole and screw. Take your time! Now screw the strap onto the
strainer slide (photo 1 below) and begin
the first bend over the end of this piece like the first photo in row
two above.
photo
1 This is before the first bend after the test fit. Basically apply even pressure and take your time. click the image |
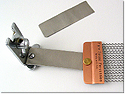 |
7. Now with the butt side installed you can put the strainer back together by making the first bend over the bridge and carefully putting the slide in place. Finish installing the strainer and you are ready to play!
Disclaimer: We will not take returns on wires that are incorrectly installed. We will also not be responsible for any damage occurred to your drum, property or self if something happens. Perform all of these steps and procedures at your own risk. We will not be liable for any damages.
The Slingerland name is a registered trademark and not affiliated with Puresound Percussion