As a starter, I'm not a professional photographer
in any sense of the word! When I started the web site I never
realized how much photography I was going to do, but now it
is a big part of my collecting and selling. I learned and picked
up things along the way by reading online and talking to professional
photographers. In my daily job I was involved with large catalog
photo shoots that required extensive product propping and styling.
The studio was about 50,000 sqf and if they needed a kitchen,
large walls would roll into place and they had departments for
everything!
This article will not go in depth on the camera
functions since there are so many different kinds of digital
cameras with a variety of features. Let's assume your camera
has some white balance, flash, and shudder speed control or
a camera that is completely automatic. Preferably a digital
camera.
The biggest issue that I have always encountered
is the lighting and even with the best cameras if the lighting
is not right then the picture will not be either. We do need
to get a few items to make the job easier so start off with
a piece of fabric either white (best for chrome hardware ),
or black. I use a fabric called Muslin which is very much like
a white sheet and it lets in light if you shine through it.
Picked up at any fabric store, get the pure white if they have
it.
Many people have also mentioned that if you
shoot outside wait for a slightly overcast day. I also have
friends that prefer a sunny day and they like to get a hot spot
on a rim so it makes a cool affect. Either way I do not have
the time to lug everything outside and I really can't wait for
weather to do my shots since I do it so regularly.
I did the next best thing and that was create
a photo booth. Not a brilliant or original idea I built mine
out of PVC pipe just like if you were going to run a small drain.
It was about 1" and I made a square box with it. Then I
covered the box with the Muslin and have a very nice photo booth.
You do not need to go to this length as long as you have the
sides top and back covered with fabric.
Be creative, you can probably set something
up with boom cymbal stands also! Get a few lights preferably
the shop type with the metal cone. I went one step further and
talked to a photographer and they recommended a special bulb
that did not throw off any yellow or blue color like other bulbs
do. They can be purchased online or at a camera supply store.
(Here is the bulb name and you can search this on Google --
ECA 250w 120V 3200K Lamp )
Here is an example of what I found on Ebay,
it is called a EZ Photo Cube. The opening on mine is much bigger
and it is square shaped. Either way this is just a sample of
what you are going for.
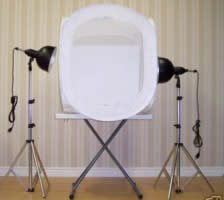
The most important part is that the light is
shining from the outside through the fabric so it casts a soft
even light on the snare drum. I even have a light from the back
and top so I get complete coverage of light.
With that said the picture above is just an
example and you will have to probably make it bigger to fit
a snare drum properly. Now with the bulbs and some type of booth
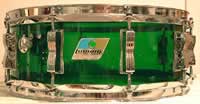
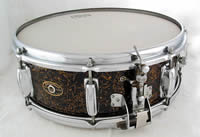
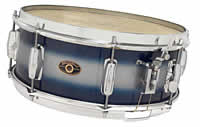
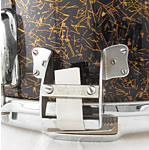
it is a matter of setting up the snare drum for the shot. I
always shot my drums straight on and after some time realized
that is not the best way to do it. Here are three examples of
drums shot on different angles.
(These do not click to larger images)
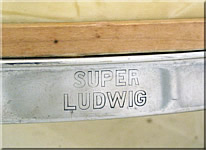
The third drum is a professional shot with some
photo shop editing to strip out the background. It was taken
by a VSD forum member Tom Vogel. here is an excellent
article that he put together on the same topic.
So if you have the lighting and the fabric set
up then you need to make sure some camera settings are correct.
Most importantly is if your camera has White Balance control
then you should be able to select the light source. My camera
has about 6 light source settings and when you select each one
the image in the view finder changes. Certain lights cast more
yellow, so I select the light source that casts no yellow at
all and then I have a white crisp clean shot. (middle photo)
Of course professional photographers have light meters and white
and or gray boards and high end cameras that if you understand
them, will make life much easier.
Shudder speed, ISO etc.. are all foreign to
me. If your camera has an ISO, I set mine between 200 and 225
and the shudder between 2.0 and 2.5. This works for me and until
I get a professional in my amateur studio to teach me exactly
for my camera then I have to stick with that.
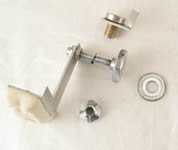
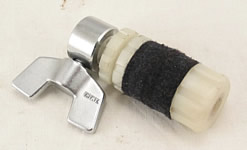
Your camera might also have a close up option
or you might have a special lens or lens adapter, but when you
want to take a close up shot of a part or drum, you need to
set that correctly or it will be very fuzzy. Here are some parts
shots from my booth that are close up and very crisp.
Your camera should have a close-up setting and
that allows the camera to be moved closer to the item you are
photographing. There are also special lenses and adapters that
make the job even easier and you can get even closer to the
item you are photographing.
So once you are set, start taking some sample
pictures! Experiment with different drum angles and lighting
to get the shot you want.
David
|